
📍참고
https://react.dev/learn/thinking-in-react
Thinking in React – React
The library for web and native user interfaces
react.dev
📍목표
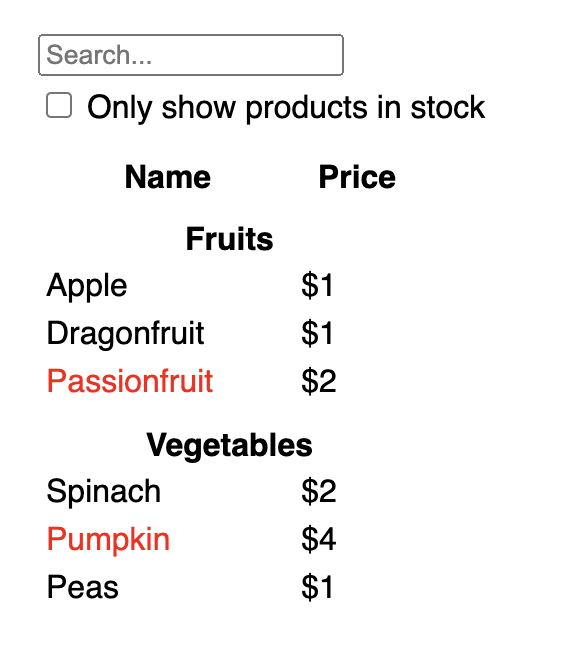
아래의 json 데이터와 디자인 목업을 React로 구현해보자
- json
[
  { category: "Fruits", price: "$1", stocked: true, name: "Apple" },
  { category: "Fruits", price: "$1", stocked: true, name: "Dragonfruit" },
  { category: "Fruits", price: "$2", stocked: false, name: "Passionfruit" },
  { category: "Vegetables", price: "$2", stocked: true, name: "Spinach" },
  { category: "Vegetables", price: "$4", stocked: false, name: "Pumpkin" },
  { category: "Vegetables", price: "$1", stocked: true, name: "Peas" }
]
- 디자인 목업
📍Step1 : UI를 컴포넌트 계층 구조로 나누기
디자이너들이 목업을 만들 때, 디자인 툴에서 이미 이름을 나눠서 만들었을 수 있으므로 그걸 참조할 수도 있다
✅3가지 관점에서 디자인을 컴포넌트로 나눌 수 있다
1. 프로그래밍 : 새로운 함수나 객체를 만드는 방식처럼 만든다
- 단일 책임 원칙 (single responsibility principle) 개념을 컴포넌트에 대입하여, 한 컴포넌트가 한가지 역할만 하게 할 수 있다
2. CSS : 클래스 선택자
- 클래스 선택자를 만드는 방식을 떠올릴 수 있다 (이 때는 BEM 방식 보다는 덜 세분화하여 컴포넌트를 만든다)
3. 디자인 : 디자인 레이어
- 디자인 레이어를 만드는 방법을 따를 수 있다
✅데이터 (json 파일)가 잘 구조화되어 있으면, 자연스럽게 그 구조를 차용하여 UI를 짤 수 있다
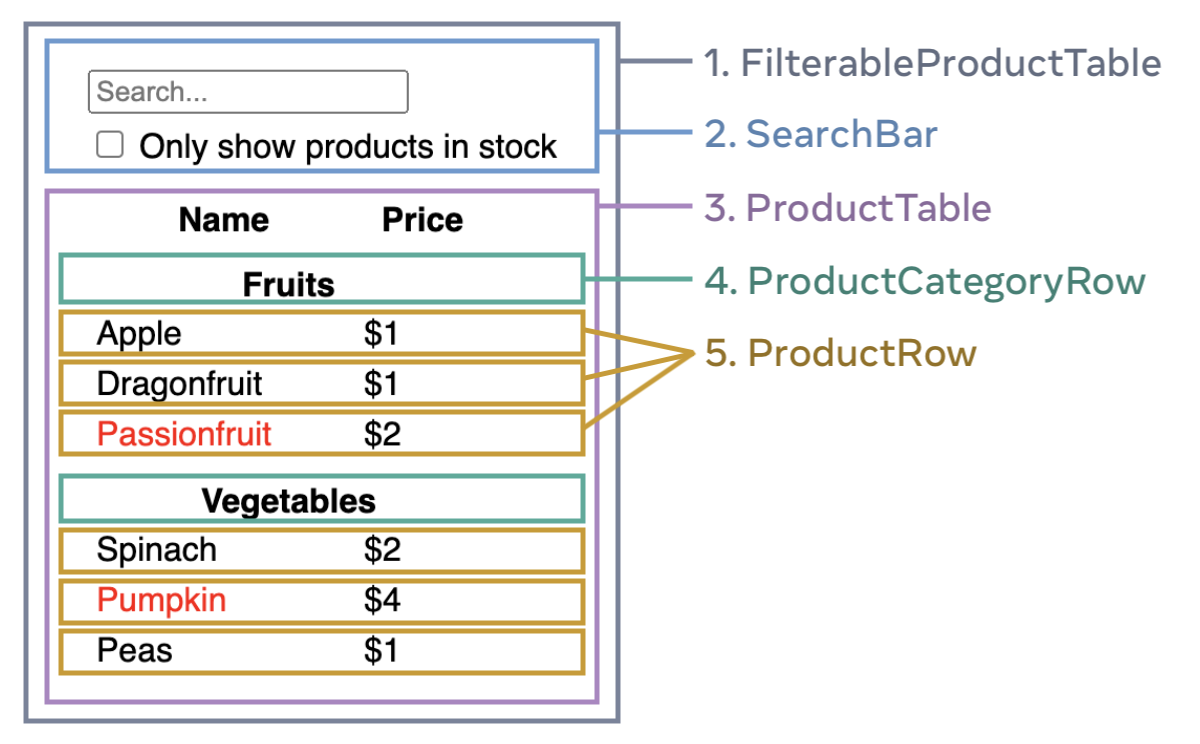
✅분할 예시
1. FilterableProductTable : 전체 앱 포함
2. SearchBar : 유저 입력을 받는 부분
3. ProductTable : 유저 입력값에 따라 리스트를 필터링해서 표시
4. ProductCategoryRow : 각 카테고리의 제목
5. ProductRow : 각 상품 행 표
완성된 컴포넌트 계층 구조
FilterableProductTable
SearchBar
ProductTable
ProductCategoryRow
ProductRow
📍Step2 : React에서 static 버전 만들기
일단 static site 처럼 상호 작용을 배제한 버전을 만들 수 있다 (나중에 상호 작용을 추가하면 된다)
- static 버전에서는 상태를 사용하지 않는다
- 상태는 변경되는 데이터를 지칭하기 때문에 static 버전에서는 필요 없다 (props 만 사용)
- App.js
function ProductCategoryRow({ category }) {
  return (
    <tr>
      <th colSpan="2">
        {category}
      </th>
    </tr>
  );
}

function ProductRow({ product }) {
  const name = product.stocked ? product.name :
    <span style={{ color: 'red' }}>
      {product.name}
    </span>;

  return (
    <tr>
      <td>{name}</td>
      <td>{product.price}</td>
    </tr>
  );
}

function ProductTable({ products }) {
  const rows = [];
  let lastCategory = null;

  products.forEach((product) => {
    if (product.category !== lastCategory) {
      rows.push(
        <ProductCategoryRow
          category={product.category}
          key={product.category} />
      );
    }
    rows.push(
      <ProductRow
        product={product}
        key={product.name} />
    );
    lastCategory = product.category;
  });

  return (
    <table>
      <thead>
        <tr>
          <th>Name</th>
          <th>Price</th>
        </tr>
      </thead>
      <tbody>{rows}</tbody>
    </table>
  );
}

function SearchBar() {
  return (
    <form>
      <input type="text" placeholder="Search..." />
      <label>
        <input type="checkbox" />
        {' '}
        Only show products in stock
      </label>
    </form>
  );
}

function FilterableProductTable({ products }) {
  return (
    <div>
      <SearchBar />
      <ProductTable products={products} />
    </div>
  );
}

const PRODUCTS = [
  {category: "Fruits", price: "$1", stocked: true, name: "Apple"},
  {category: "Fruits", price: "$1", stocked: true, name: "Dragonfruit"},
  {category: "Fruits", price: "$2", stocked: false, name: "Passionfruit"},
  {category: "Vegetables", price: "$2", stocked: true, name: "Spinach"},
  {category: "Vegetables", price: "$4", stocked: false, name: "Pumpkin"},
  {category: "Vegetables", price: "$1", stocked: true, name: "Peas"}
];

export default function App() {
  return <FilterableProductTable products={PRODUCTS} />;
}
최상위 컴포넌트인 FilterableProductTable 컴포넌트는 props를 받아 하위 컴포넌트들에 데이터를 전달한다
- one-way data flow (단방향 데이터 바인딩)
📍Step3 : UI 상태의 최소이며 완전한 표현 찾기
⭐UI를 동적으로 만들기 위해서는 유저가 앱 기저의 데이터 모델을 바꿀 수 있어야 한다. 이를 위해 상태를 사용한다
⭐상태 : 앱이 기억해야할 최소의 변경되는 데이터 집합
✅상태를 만드는 가장 중요한 원칙 : DRY (Don't Repeat Yourself)
- 예를 들어 쇼핑 리스트를 구현한다면, 모든 아이템 리스트를 배열로 상태에 저장할 수 있다
- 이 때, 총 아이템 갯수 데이터가 필요하다면, 추가로 상태를 만드는게 아니라, 배열의 길이를 사용하면 된다!
✅이제 예제 앱을 위해 필요한 데이터 조각을 생각해본다
- 상품 리스트 원본
- 유저가 입력한 검색어 텍스트
- 체크박스 값
- 필터링된 상품 리스트
✅이중에서 상태가 아닌것을 찾으려면..
- 시간이 지나도 변하지 않는 데이터 -> 상태 X
- 부모 컴포넌트에서 전달받는 props -> 상태 X
- 기존 상태나 props에서 계산하여 만들 수 있는 데이터 -> 상태 X
✅진짜 상태는?
X 상품 리스트 원본 (props)
O 유저가 입력한 검색어 텍스트 (상태)
O 체크박스 값 (상태)
X 필터링된 상품 리스트 (props에서 만들 수 있음)